
Everyone loves a dinner party. Some enjoy hosting them while others prefer to only ever attend as a guest.
Despite our lives being made ever easier by shortcuts in the kitchen the idea of cooking for a dinner party still manages to instil dread in a lot of people. Perhaps it is the uncertainty, the lack of consistency that plagues them.
Sometimes everything goes perfectly and you wave off your guests at the end of the evening asking yourself why you don’t do it more often. Other times everything seems to go wrong – a dish doesn’t turn out the way you expected or something ends up burned and you set off the smoke alarm. The night slowly unravels and you silently plead that your guests will leave early. Later you stand in the kitchen stacking the dishwasher and vow to never put yourself through that again.
But it really needn’t be like that. What if you could host dinner party after dinner party and always have the same fabulous result? After many years and countless parties I finally feel that I have learned enough to get it right. So let me share with you the tips that will ensure success every time and allow you to invite your friends over with no sense of doom or dread.
Tip 1 – Keep the numbers to a moderate level. Six to eight, I reckon, although personally I tend to think six is the magic number. Everyone can easily sit around the table with plenty of room and you’re able to enjoy a group conversation. Too many guests and you end up with cliques of people and various conversations going on, people chair swapping and it can get a bit circus-like. If you want to invite a lot of people then think more along the lines of drinks and nibbles.
Tip 2 – Get the dynamics right. Invite people you know will enjoy each other’s company and be like-minded so that the conversation flows and is effortless. A sure-fire way to failure is to host an evening that is filled with awkward small talk.
Tip 3 – Cook in advance! I always, without question, plan a menu that involves cooking most of it in advance. It’s too easy for things to go wrong when your menu involves last minute flash frying and skin of your teeth cooking. I particularly love to give dinner parties during the winter months because I can prepare a stunning casserole way ahead of time (and these sorts of dishes often improve after a day in the fridge) and it only needs re-heating on the night. Many desserts can also be made in advance.
Tip 4 – Avoid cooking something you’ve never tried before. And I don’t mean throwing together a new salad or something easy. But if it is a rather complex recipe and you’ve never tried it before why put yourself through the anguish of worrying that it might not turn out right? Go with something you’re comfortable with and you know will taste fabulous.
Tip 5 – Prepare, prepare, prepare. Have the table set before your guests arrive, clear all the dishes from your prep work, have some music playing, the wine chilled, glasses on the bench ready to be filled. When your guests arrive all you need do is pour them a drink and start enjoying their company.
Tip 6 – If you have teenagers or older children who have also enjoyed the fruits of your labour, enlist their help with the washing up later on.
And there you have it. But the point that I would particularly like to drive home is that dinner parties are all about the people. You invite your friends over because you want to enjoy their company and vice versa. It was Nigella Lawson (my ultimate food hero) who once said that as important as food is at a dinner party, it’s never as important as the conversation. How could it be said better?
I did recently attend a dinner party at the house of some very dear friends. I felt at the end of the evening that it was somewhat of a master class on how to host the perfect dinner party. They pulled it off so effortlessly you couldn’t help but marvel and feel privileged to have been a part of it.
I suppose it helped that they both have a keen interest in food. But to further ensure success they had a secret weapon. And I am thrilled that they have generously allowed me to share it with you – how to hot smoke your own salmon. I can’t tell you how delicious this was. Streets ahead of anything I’ve bought previously at the supermarket. My husband and I were lucky enough to take home some leftovers and it was just as delicious cold from the fridge the next day.


Hot Smoked Salmon
First you need to purchase a fresh salmon fillet. You can go for a whole salmon (and it’s only about 2/3 of the price) but you’ll need to be up to dealing with the bones.
To prep the salmon, first dry both sides with paper towel and then take out the pin bones. You can get proper fish bone tweezers, which pop them out easily.
Now rub sea salt all over the fillet – you’ll need ½ to 1 tablespoon depending on how much seasoning you normally like on your food. Once that’s done place it in the fridge for about an hour.
Take it out of the fridge and rinse off the salt – it will have dissolved into the flesh by this time anyway and, in fact, this step is optional. If you skip it your salmon will be slightly saltier.
Pat both sides of the salmon dry with paper towel and then rub brown sugar into the flesh. The sugar will dissolve and go a bit runny so it’s a good idea to do this on some foil to save on mess (double thickness of foil for a large fillet as it makes it easier to pick up and stops the foil tearing). If you want to get creative with the flavours then you can add more than just the sugar – perhaps some herbs, whiskey or whatever takes your fancy (within reason!)
While the sugar is absorbing get on with preparing the hot smoker.
Firstly, clear the area you’re going to place the smoker on and make sure it is free from any flammable materials. You also need to make sure you’re not doing this near any shrubs or trees that could ignite when subjected to high heat. And definitely don’t do this on a wooden deck or flammable surface! Trust me, someone has already made these mistakes to warn others.
If you’re stuck for a safe place a good idea is to place your smoker on top of your barbecue grill plates. Don’t use the barbecue burners; you are simply using it as a safe surface. You would then place the tins for the methylated spirits on top of the grill plate and then the smoker on top of those.
Just another quick note about safety – make sure you read the instructions carefully when you buy your smoker because it will have all the tips you need to stay safe.
Place the smoker on a flat even surface and put the burner tin/s on the solid ground. Fill the burner tin/s with methylated spirits, but be careful not to spill or overfill the dishes. In the bottom tray spread a thin layer (about a handful) of Manuka sawdust. Do not use a thicker layer as this can create a build-up of tannins that can sometimes give the food an unpleasant taste.
Now carefully light the methylated spirits and place the smoker over the tins. Place your fish on to the smoker rack and cover – sometimes you might need to place a few rocks on top to keep the lid down.
After the methylated spirits has burned away the smoker will continue to release smoke for some time. You can control how much smoke flavour you want by the point at which you remove the fish. It’s best to leave the fish to rest for at least fifteen minutes before you remove it. My friend told me he usually waits until the smoke has stopped coming from under the lid. The fish is still warm and most of the juices have been absorbed.
Once your smoker is alight you can get on with other things while the cooking process takes care of itself. But check it regularly to ensure that it stays alight because sometimes things like wind, etc can cause the flame to go out before the methylated spirits has burned away.
A note on the cooking time – approximately 15-30 minutes depending on the smoker size, plus resting time of 15 minutes to an hour. A bit of trial and error is required here to find what works best for your smoker and your tastes. But my friend tells me that even the errors are very nice!
Take the fish off the rack and serve in the foil on a platter – the fish will slide away and leave the skin behind. It’s best eaten while still a little warm (not hot!) by which time the flavour is more developed.
This is the most delicious hot smoked salmon I’ve ever tasted. And it’s just as good if not better after resting overnight in the fridge.
Now here are some useful notes on purchasing a smoker:
FISH HOT SMOKER
Approximately $50.00-100.00
Kilwell make a good one but you don’t need to spend a lot.
The Warehouse has a small one for $35.00. A small one is fine because you can always cut up your fillet to fit the space (although it looks more impressive as a whole fillet). It just depends how many you are catering for. You can still do a small fillet in a large smoker without affecting the result. The trick is in how much methylated spirits you put in the dishes as this controls cooking time. All the instructions come with your smoker.
It’s a good idea to wash the lower tray and lid in warm soapy water before you use it – rinse with fresh water and thoroughly dry. My friend usually scrubs the rack after use and scrapes away any juices/brown sugar that may have stuck to the lower tray. If you don’t follow this step it will release a bitter smoke next time.


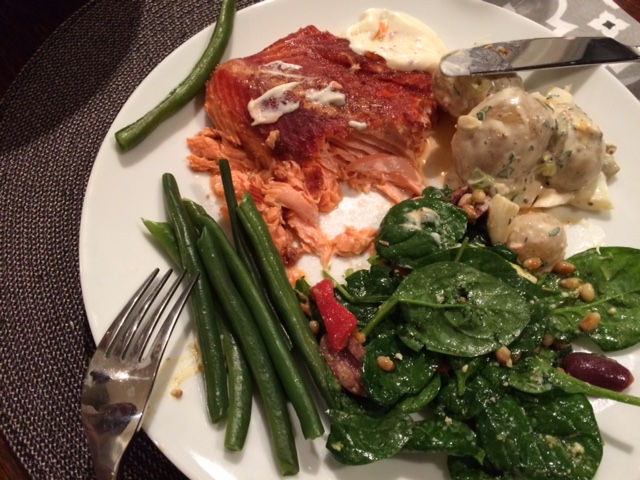
Once you bring this divine salmon to the table it is entirely up to you what you serve with it. The beauty however is that because the salmon is the star of the show the accompaniments are best left simple, which makes your job even easier. You will see from the photos that our friends chose to serve theirs with a fresh spinach salad, new potatoes in a divine creamy dressing and blanched green beans, none of which entail much effort.
A nice aioli is also lovely to serve with the salmon. If you want to jazz it up a bit you could add a bit of chilli and lime.
I hope you will also see from the photographs that everyone lucky enough to be sitting at that table was having a thoroughly fabulous time. The perfect dinner party.


Can just about taste it by only looking at it.Bon appetite xx
LikeLike
A good read Tracey but we are not really into dinner parties. However, I am sure many of your readers are,
LikeLike